"The engines don’t move the ship at all. The ship stays where it is and the engines move the universe around it."Futurama
Tiny Real OpenGL Application
After completing the tutorial about building my own graphics pipeline. I will continue my journey to trully understand 3D graphics by looking at OpenGL.
OpenGL Toolkit
I’m using GLFW v3.2.1 as a toolkit to manage windows and user inputs. It has been installed by means of Home Brew.
Shaders
Shaders have to be compiled at runtime. This usually happens at startup.
1
2
3
4
5
6
7
// if only one src code then sz=1 and length omitted
glShaderSource(id, sz, ptr_to_code, length);
// compile the src
glCompileShader(id);
// to check for invalid values or errors
glGetShaderiv(id, flag, ptr_to_buffer);
glGetShaderInfoLog(id, log_length, msg_length /*NULL*/, ptr_to_msg);
After compiling the shader code, they have to be linked to a created programm.
1
2
3
4
GLuint program_id = glCreateProgram();
glAttachShader(program_id, vertex_shader_id);
glAttachShader(program_id, fragment_shader_id);
glLinkProgram(program_id);
GL Shader Language (GLSL)
Vertex Shader
1
2
3
4
5
6
7
8
9
10
11
12
13
14
// version description
#version 330 core
// location: buffer we use for the variable
// in: input data (corresponding out)
// vec3: data type
layout(location = 0) in vec3 variable_name;

// main
void main()
{
  //  gl_Position: built-in variable
  gl_Position.xyz = variable_name;
  gl_Position.w = 1.0;
}
Fragment Shader
1
2
3
4
5
6
7
8
9
10
// version description
#version 330 core
// out: output data
// vec3; data type
out vec3 variable_name;
// main
void main()
{
  variable_name = vec3(1,0,0);
}
Homogeneous Coordinates
Remember forever:
- if , then the vector is a position in space
- if , then the vector is a direction in space
Homogeneous coordinates allow us to use a single mathematical formula to deal with these two cases.
Model Matrix
To go from Model Space (all vertices efined relatively to the cetner of the model) to World Space (all vertices defined relatively to the center of the world), we have to multiply all vertices by the Model Matrix.
View Matrix
To go from World Space (all vertices defined relatively to the center of the world) to Camera Space (all vertices defined relatively to the camera, we have to multiply all vertices in World Space by the View Matrix.
1
2
3
4
5
glm::mat4 CameraMatrix = glm::lookAt(
  cameraPosition, // the position of your camera, in world space
  cameraTarget,   // where you want to look at, in world space
  upVector        // probably glm::vec3(0,1,0)
);
Projection Matrix
In Camera Space a vertex that happens to have and should be rendered at the center of the screen. To take the depth into account we have to get into Perspective Projection. This is done by multiplying by the Projection Matrix.
1
2
3
4
5
6
7
// Generates a really hard-to-read matrix, but a normal, standard 4x4 matrix nonetheless
glm::mat4 projectionMatrix = glm::perspective(
  glm::radians(FoV), // The vertical Field of View, in radians: the amount of "zoom".
  4.0f / 3.0f,       // Aspect Ratio. Depends on the size of your window.
  0.1f,              // Near clipping plane. Keep as big as possible, or you'll get precision issues.
  100.0f             // Far clipping plane. Keep as little as possible.
);
Example Of Shaders
The input variable to the shaders have to be passed and/or to be en-/disabled in the C++ code as follows:
1
2
3
4
5
6
7
8
9
10
11
12
13
14
15
16
17
18
19
20
21
22
23
24
25
26
27
28
29
GLuint program_id = LoadShaders("path/filename.vs", "path/filename.fs");

// get a handle for our "MVP" uniform
GLuint matrix_id = glGetUniformLocation(program_id, "MVP");
do {
  glUseProgram(program_id);

  // send uniform variable to the shader
  glUniformMatrix4fv(matrix_id, 1, GL_FALSE, pointer_matrix_begin);

  // enable connection
  glEnableVertexAttribArray(0);		// layout location 0
  glBindBuffer(GL_ARRAY_BUFFER, vertex_buffer);

  glVertexAttribPointer(
    0,          // attribute 0
    3,          // size
    GL_FLOAT,   // type
    GL_FALSE,   // normalized
    0,          // stride
    (void*)0    // array buffer offset
  );

  glDrawArrays(GL_TRIANGLES, 0, cnt);

  // disable connection
  glDisableVertexAttribArray(0);

} while (true);
1
2
3
4
5
6
7
8
9
10
11
12
13
14
15
16
17
#version 330 core

// input vertex data, different for all executions of this shader
layout(location = 0) in vec3 vertexPosition_modelspace;
layout(location = 1) in vec3 vertexColor;

// values that stay constant for the whole mesh
uniform mat4 MVP;

// output data
out vec3 fragmentColor;

void main()
{
  gl_Position = MVP * vec4(vertexPosition_modelspace, 1);
  fragmentColor = vertexColor;
}
1
2
3
4
5
6
7
8
9
10
11
12
#version 330 core

// input data
in vec3 fragmentColor;

// output data
out vec3 color;

void main()
{
  color = fragmentColor;
}
Buffers And Textures
Creating textures is very similar to creating vertex buffers: Create a texture, bind it, fill it, and configure it.
In glTexImage2D, the GL_RGB indicates that we are talking about a 3-component color, and GL_BGR says how exactly it is represented in RAM. As a matter of fact, BMP does store , and this has to be told to OpenGL.
1
2
3
4
5
6
7
8
9
10
11
12
13
14
15
16
17
18
19
20
21
22
23
24
25
26
27
28
29
30
31
32
33
34
35
36
// create an OpenGL texture
GLuint textureID;
glGenTextures(
  1,          // number of texture names to be generated
  &textureID  // array which stores the generated texture names
  );

// BIND the newly created texture: all future texture functions will modify texture
glBindTexture(
  GL_TEXTURE_2D,   // specify target
  textureID        // texture name
  );

// FILL the image and give it to OpenGL
glTexImage2D(
  GL_TEXTURE_2D,      // target texture
  0,                  // level of detail
  GL_RGB,             // internal format
  width, height,      // texture image
  0,                  // border
  GL_BGR,             // data format
  GL_UNSIGNED_BYTE,   // data type
  data                // ptr to image data
  );

// CONFIGURE it (poor filtering)
glTexParameteri(
  GL_TEXTURE_2D,          // target texture
  GL_TEXTURE_MAG_FILTER,  // symbolic name
  GL_NEAREST              // value of name
  );
glTexParameteri(
  GL_TEXTURE_2D,
  GL_TEXTURE_MAG_FILTER,
  GL_NEAREST
  );
Compressed Textures
A useful tool to create compressed textures, which are understood by the graphics hardware is The Compressonator. It can produce mipmaps inthe formats DXT1, DXT3 or DXT5. Your graphics card provides dedicated hardware to decompress such file formats. Therefor using texture compression yields a 20% increase in performance.
This link provides information about the file layout of a .dds file.
Texture Sampler
A texture sampler helps to access the color at a specific UV coordinate in a texture. This is done in the fragment shader.
1
2
3
4
5
6
7
8
9
10
11
12
13
// interpolated values from the vertex shaders
in vec2 UV;

// output data
out vec3 color;

// values that stay constant for the whole mesh
uniform sampler2D textureSampler;

void main()
{
  color = texture(textureSampler, UV).rgb;
}
Basic Shading
This includes the following lighting effects which increase the realism of the scene: ambient, diffuse and specular light.
Vertex Shader
The vertex shader is used to compute the normal vectors, the eye point coordination and light direction vector. All three must be in the same space.
1
2
3
4
5
6
7
8
9
10
11
12
13
14
15
16
17
18
19
20
21
22
23
24
25
26
27
28
29
30
31
32
33
34
35
36
37
38
39
40
41
42
43
//input vertex data
/* location 0 is used for vertex position */
layout(location = 1) in vec2 vertexUV;
layout(location = 2) in vec3 vertexNormal_modelspace;

// output data ; will be interpolated for each fragment
out vec2 UV;
out vec3 Position_worldspace;
out vec3 Normal_cameraspace;
out vec3 EyeDirection_cameraspace;
out vec3 LightDirection_cameraspace;

// values that stay constant for the whole mesh
uniform mat4 MVP;
uniform mat4 V;
uniform mat4 M;
uniform vec3 LightPosition_worldspace;

void main()
{
  /* output position of the vertex, in clip space : gl_Position */

  // position of the vertex, in worldspace : M * position
  Position_worldspace = (M * vec4(vertexPosition_modelspace, 1)).xyz;

  // vector that goes from the vertex to the camera, in camera space

  //  in camera space, the camera is at the origin (0,0,0)
  vec3 vertexPosition_modelspace = (V * M * vec4(vertexPosition_modelspace, 1)).xyz;
  EyeDirection_cameraspace = vec3(0,0,0) - vertexPosition_modelspace;

  // vector that goes from the vertex to the light, in camera space.
  //  M is ommited because it's identity
  vec3 LightPosition_cameraspace = (V * vec4(LightPosition_worldspace, 1)).xyz;
  LightDirection_cameraspace = LightPosition_cameraspace + EyeDirection_cameraspace;

  // normal of the vertex, in camera space
  //  generally use its inverse transpose
  Normal_cameraspace = (V * M * vec4(vertexNormal_modelspace, 0)).xyz;

  // UV of the vertex. no special space for this one
  UV = vertexUV;
}
Fragment Shader
1
2
3
4
5
6
7
8
9
10
11
12
13
14
15
16
17
18
19
20
21
22
23
24
25
26
27
28
29
30
31
32
33
34
35
36
37
38
39
40
41
42
43
44
45
46
47
48
49
50
51
52
53
54
55
56
57
58
59
60
61
// interpolated values from the vertex shaders
in vec2 UV;
in vec3 Position_worldspace;
in vec3 Normal_cameraspace;
in vec3 EyeDirection_cameraspace;
in vec3 LightDirection_cameraspace;

// out data
out vec3 color;

// values that stay constant for the whole mesh
uniform sampler2D textureSampler;
uniform mat4 MV;
uniform vec3 LightPosition_worldspace;

void main()
{
  // light emission properties
  vec3 LightColor = vec3(1,1,1);
  float LightPower = 50.f;

  // material properties
  vec3 MaterialDiffuseColor = texture(myTextureSampler, UV).rgb;
  vec3 MaterialAmbientColor = vec3(0.1,0.1,0.1) * MaterialDiffuseColor;
  vec3 MaterialSpecularColor = vec3(0.3,0.3,0.3);

  // distance to the light
  float distance = length(LightPosition_worldspace - Position_worldspace);

  // normal of the computed fragment, in camera space
  vec3 n = normalize(Normal_cameraspace);

  // direction of the light (from the fragment to the light)
  vec3 l = normalize(LightDirection_cameraspace);

  // cosine of the angle between the normal and the light direction, clamped above 0
  //  - light is at the vertical of the triangle -> 1
  //  - light is perpendicalur to the triangle -> 0
  //  - light is behind the triangle -> 0
  float cosTheta = clamp(dot(n,l), 0, 1);     // clamp between 0 and 1

  // eye vector (towards the camera)
  vec3 E = normalize(EyeDirection_cameraspace);

  //direction in which the triangle reflects the light
  vec3 R = reflect(-l, n);

  // cosing of the angle between the Eye and the Reflect vector
  //  - looking into the reflection -> 1
  //  - looking elsewhere -> (< 1)
  float cosAlpha = clamp(dot(E,R), 0, 1);

  // final color
  color =
          // ambient : simulates indirect lighting
          MaterialAmbientColor +
          // diffuse : "color" of the object
          MaterialDiffuseColor * LightColor * LightPower * cosTheta / pow(distance,2) +
          // specular : reflective highlight, like a mirror
          MaterialSpecularColor * LIghtColor * LightPower * pow(cosAlpha, 5) / pow(distance,2);
}
Ambient Lighting
This is most faked light in computer graphics. It is done by adding simply a fixed value in the shader. It simulates indirect light.
Diffuse Lighting
This is the color of the object.
Specular Lighting
This is the reflective highlight like a mirror.
VBO Indexing
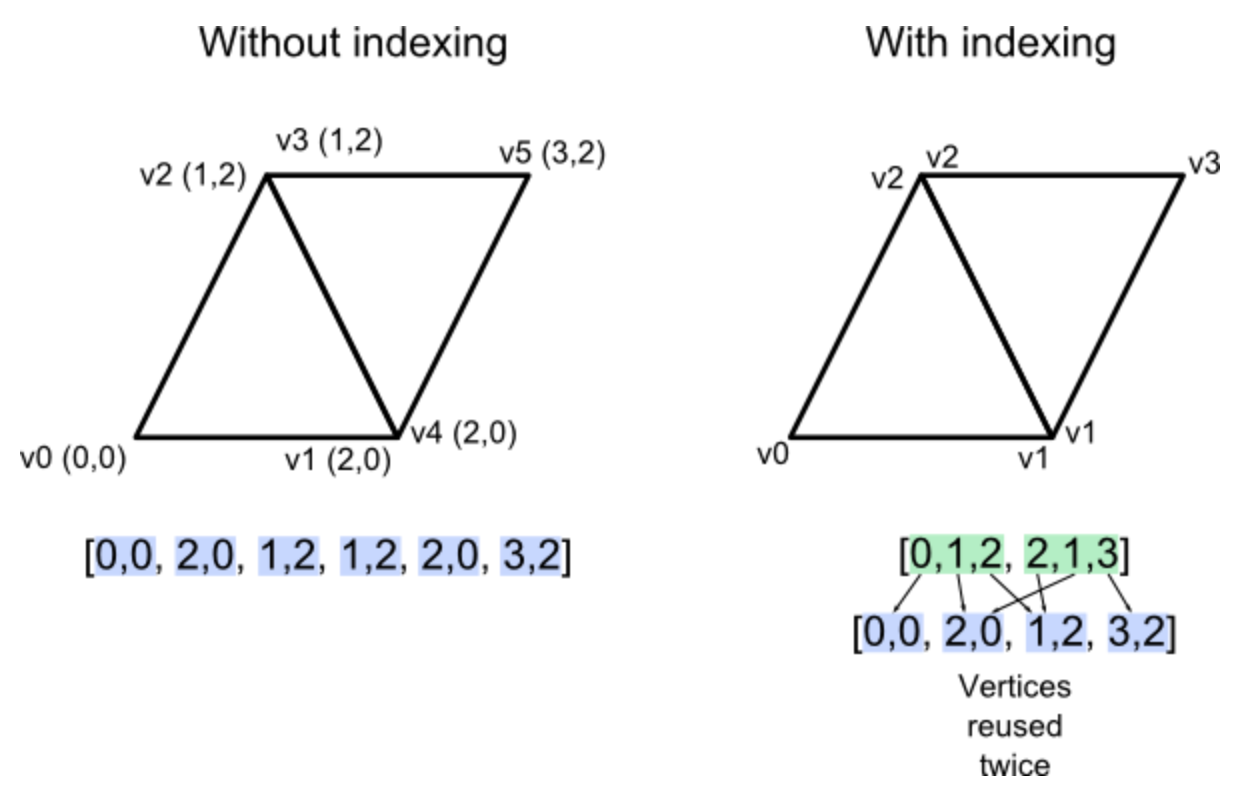
The principal of indexing reduces the duplication of vertices shared at an edge. It enables to reuse the same vertex over and over again. This is done with an index buffer.
Instead of generating of buffer with an ARRAY_BUFFER now it is an ELEMENT_ARRAY_BUFFER.
1
2
3
4
5
6
7
8
9
10
11
12
13
std::vector<unsigned int> indices;
/* fill "indices" as needed */

// generate a buffer for the indices
GLuint elementbuffer;
glGenBuffers(1, &elementbuffer);
glBindBuffer(GL_ELEMENT_ARRAY_BUFFER, elementbuffer);
glBufferData(
  GL_ELEMENT_ARRAY_BUFFER,
  indices.size() * sizeof(unsigned int),
  &indices[0],
  GL_STATIC_DRAW
  );
and the corresponding draw command looks like this:
1
2
3
4
5
6
7
8
9
10
// index buffer
glBindBuffer(GL_ELEMENT_ARRAY_BUFFER, elementbuffer);

// draw the triangles
glDrawElements(
  GL_TRIANGLES,     // mode
  indices.size(),   // count
  GL_UNSIGNED_INT,  // type
  (void*)0          // element array buffer offset
);
Text Font
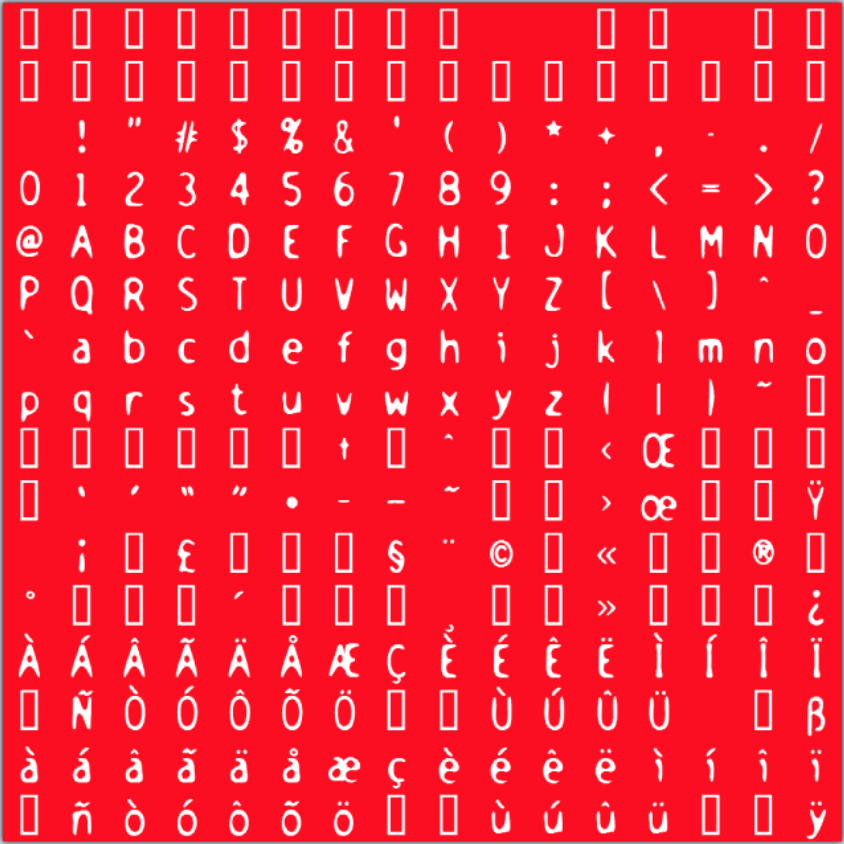
To display text on the screen we have to use bitmaps and a texture containing the font. CBFG can help to generate such a texture. Remark: CBFG is only Win32 specific. There is no portable version for Linux/Mac of it.
Read this article to get some background on ASCII, ANSI and Unicode. Further, here is the link to the unicode consortium. And this tool lets you find every character.
Finally, an interessting link from Valve about displaying fonts sharply.
Create per character two polygon’s and choose by means of the UV-coordinates the right position of the texture.
A Little Excurs into Unicode
Unicode defines for every possible character a so called code point consisting of a letter U and a hex.
Hello
is represented, in Unicode, as the corresponding five code points:
U+0048 U+0065 U+006C U+006C U+006FEncodings
These code points are now stored in a specific amount of bytes and order (high-endian or low-endian). There are hundreds of traditional encodings which can only store some code points correctly and change all the other code points into a little question marks ﹖ or a box .
UTF-8
UTF-8 is system for storing your string of Unicode code points in memory using 8 bit bytes. In UTF-8, every code point from 0-127 is stored in a single byte. Only code points 128 and above are stored using 2, 3, up to 6 bytes.
This has the neat side effect that English text looks exactly the same in UTF-8 as it did in ASCII.
Most Important Fact About Encodings
There Ain’t No Such Thing As Plain Text
Luckily, almost every encoding in common use does the same thing with the characters between 32 and 127, so we can always get this far on the HTML page without starting to use funny letters:
1
2
3
<html>
  <head>
    <meta http-equiv="Content-Type" content="text/html; charset=utf-8">
But this meta tag really has to be the very first thing in the <head> section because as soon as the web browser sees this tag it’s going to stop parsing the page and start over after reinterpreting the whole page using the encoding you specified.
Normal Mapping
It is also called bump mapping. The basic idea of normal mapping is to sample a texture to get the per pixel normals.
The texture has a general blue tone because overall, the normals is towards the outside of the surface. As usual X is right in the plane, Y is up and given the right hand rule Z points to the outside of the plane of the texture.
Dabour Space
This is known as the Dabour space and is aligned to the local coordinate system per polygon. The normal, which is expressed in the space of each individual triangle (tangent space or image space), has to be converted into model space.
Tangent and Bitangent
To choose an appropriate coordinate system and to be consistent with the neighbors, the tangent is choosen to be in the same direction as the texture coordinates.
After solving this educations for and it can be used for calculating the tangent and bitangent:
1
2
3
float r = 1.0f / (deltaUV1.x * deltaUV2.y - deltaUV1.y * deltaUV2.x);
glm::vec3 tangent = (deltaPos1 * deltaUV2.y   - deltaPos2 * deltaUV1.y)*r;
glm::vec3 bitangent = (deltaPos2 * deltaUV1.x   - deltaPos1 * deltaUV2.x)*r;
Render To Texture
Rendering to a texture contains three tasks: Creating the texture in which we are going to render, render something and use the generated texture.
The destination which is rendered to is called a Framebuffer. It is a container for textures and an optional depth buffer and is created just like any other object in OpenGL.
1
2
3
4
5
// the framebuffer, which regroups 0, 1 or more textures ;
//  and 0 or 1 depth buffer
GLuint FramebufferName = 0;
glGenFramebuffers(1, &FramebufferName);
glBindFramebuffer(GL_FRAMEBUFFER, FramebufferName);
A empty texture has to be created which will contain the RBG output of the shader.
1
2
3
4
5
6
7
8
9
10
11
12
13
14
15
16
17
18
19
20
21
22
// the texture in which it will be rendered
GLuint renderedTexture;
glGenTextures(1, &renderedTexture);

// bind the texture
glBindTexture(GL_TEXTURE_2D, renderedTexture);

// give an empty image to OpenGL ; indicated by the last "0"
glTexImage2D(
  GL_TEXTURE_2D,     // target texture
  0,                 // level of detail
  GL_RGB,            // internal format
  1024, 768,         // texture image
  0,                 // border
  GL_RGB,            // data format
  GL_UNSIGNED_BYTE,  // data type
  0                  // ptr to image data
);

// filtering
glTexParameteri(GL_TEXTURE_2D, GL_TEXTURE_MAG_FILTER, GL_NEAREST);
glTexParameteri(GL_TEXTURE_2D, GL_TEXTURE_MIN_FILTER, GL_NEAREST);
After creating the texture, the framebuffer can be configured:
1
2
3
4
5
6
7
8
9
10
11
12
13
14
15
// set the texture as color attachement #0
glFramebufferTexture(
  GL_FRAMEBUFFER,        // target buffer
  GL_COLOR_ATTACHMENT0,  // attachment point
  renderedTexture,       // texture object
  0                      // mipmap level of the texture
);

// set the list of draw buffers into which outputs from
//  fragment shader will be written
GLenum DrawBuffers[1] = {GL_COLOR_ATTACHMENT0};
glDrawBuffers(
  1,             // number of buffers
  Drawbuffers    // specifies the buffers to be written into
);
To render to the texture is straightforward. Simply bind the framebuffer and draw the scene as usual.
1
2
3
4
5
glBindFramebuffer(GL_FRAMEBUFFER, FramebufferName);
glViewport(
  0, 0,        // x, y of lower left corner
  1024, 768    // width and height of the viewport
)
Fragment Shader
The output from the fragment shader has to be into a Render Target, which happens to be the texture.
1
layout(location = 0) out vec3 color;